
As a bronze sculptor of over 30 years, one thing I know for sure is that a good color or patina on bronze can make or break the artwork.
I’m not like a painter who works with color all day long. Working with a bronze sculpture, the only real exposure I have to color in my work is the patina or stain that is applied by the foundry before I send the artwork off to the client. Often I am standing by the side of the person doing the patination and giving them direction of color. I am an art director indicating, “cool,” “warm,” “more yellow”, etc.. They usually respond with a chemical equation that makes my eyes gloss over. They know how each chemical or combinations of chemicals will react with the metal.
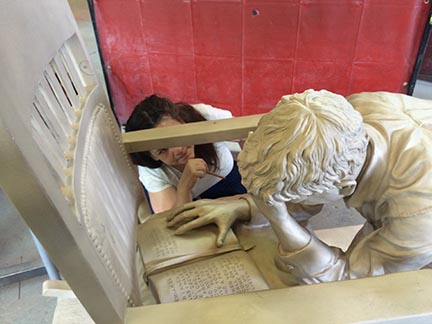
Before a traditional bronze goes through patina the metal is checked by the artist and sand blasted.
As I am incorporating more and more 3D technology and preparing for the 3D Printer World Expo 2015. I want to explore the idea of creating a metal patination on a 3D printed piece of art. Art that is created in another material entirely, such as 3D printing. I am working on a monumental job right now that I would love to turn into a small maquette in bronze. I might not be able to afford to pour my bronze to show in a gallery, but I might be able to 3D print the pieces, stain them and then take orders for the bronze sculpture.
I learned about Sculpt Nouveau at the CNC Carvewright conference here in Houston a few years back. I could not wait to try the products.
I have used other paints on different materials to create a bronze look. For example, a product called Rub n Buff makes a wonderful bronze paint. You can put that on top of terracotta clay and as the final coat, add some Cordovan shoe polish. Top the entire thing off with a coat of Johnson Paste Wax and voilà you have what looks like bronze. FYI —be sure to spend some time rubbing back the different layers to allow the colors to shine through and the darker colors to recess into the crevices and give you so
me contrast.
I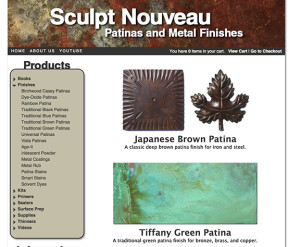 have listed Sculpt Nouveau in my book “3D Technology in Fine Art and Craft: Exploring 3D Printing, Scanning, Sculpting, and Milling.” Focal Press 2015.
I’m interested in experimenting with several different post processing techniques on 3D prints and hearing about what others do to obtain some great looking art on different materials.
Oh, and I must share a tip from Joel Mongeon– another artist featured in the book. Joel said he had great luck using a simple 3D Printing pen to fix errors in FDM 3D prints. There are other tricks of the trade, which are shared in the book and more that I will share here, but for now, let’s get back to the patinas.
If you walk into the gallery of Shidoni Foundry, you will see that patinas vary in color, intensity, and application. What I refer to as a “traditional” patina was found on theSculpt Nouveau website far right handle, see image capture. I asked Jacob from Sculpt Nouveau what he would do to get this look on a traditional plastic piece. He said we would start by applying metal coating “copper”. This he would probably stipple as it will show brush strokes.
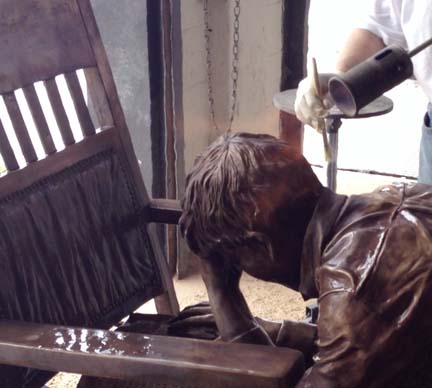
A “hot” method of applying patina means the metal is headed up with a torch.
These are, of course, cold applications. Meaning… you are not heating anything up. We can’t heat the 3D print up as it is plastic, but it is good to point out that Sculpt Nouveau divides their stains up into both hot and cold. Hot and Cold refer to the application. In the foundry, the foundryman doing the patina will heat the metal up with a torch and then apply the chemicals. That is what Sculpt Nouveau refers to as a “hot” application.
Jacob suggests I follow this copper with brown, yellow and black in that order of the Patina stains. I am of course worried that the black would mute the entire piece when all I really want is black in the crevices. Jacob prefers the spray cans of stain rather than the paint but in the case of the black, he would recommend I get a can. With a can, I can control where I place the black. Another option, of course, would be black wax. Apparently, I can control the transparency with the spray cans. This will be important for me to get the look I am after. 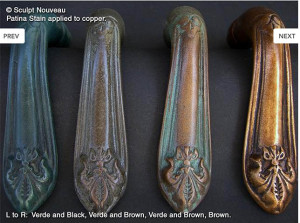
He also suggests sealing the entire project with a coat of sealant, which can be a Crystal Clear glossy or matt. However, they also sell sealants at Sculpt Nouveau.
- Please note, an artist may be able to rub back one layer after it dries to reveal the layer beneath. Rubbing back can be done carefully with steel wool and should be done before they apply the final sealant.
With traditional patination, the patina artist in the foundry knows that the order in which to apply the chemicals. Knowing how much to dilute a chemical is also important. The person in the foundry that creates the patinas is an artist, and I refer to them as such. A person who knows patination work is, in my book, a creative genius. Or at least you hope they are.
- Some other thins to watch out for.
- Check all materials on scrap before applying it to your art.
- Patina and color can look different on different materials.
- Patina can make surface imperfections stand out. This means you might want to do some prep on surfaces to prevent the 3D layering from being enhanced.
- Paint or patina on any surface may sink into crevices which may make the art look flat.
At the time of writing this, I am a panel Artist at “Artist as Entrepreneur” at 3D Printer World Expo 2015, and I’m also showing my work in the gallery. I’m bringing several pieces to the show and would love to have them beforehand so that I could try these stains on them. In a pinch I would even bring the materials to Burbank and try them on the pieces the afternoon of the show, so they are ready for the gallery. However, I’m told that the metal coating takes at least a day to dry. And I know that rushing these processes is not a good idea. Oh, well, next time perhaps.
I wanted to share this research into some patinas and stains and can’t wait to see what others do with this. I have seen some great Steampunk art created with these stains. I’ll document my process when I get back in the studio and post it here.
If you are like me, you have worked hours on your art and would like to present it in the best light. Anyone touching a piece that an artist stains in this way will know that it is not bronze, simply by the weight. But presenting the art in such a way may just give you the opportunity to sell the work and give you the revenue to create it in a more expensive material.
 FINE ART/WRITING/SPEAKING
Bridgette Mongeon is available for lectures and workshops-
TWITTER- SculptorWriter
Facebook
Sculptor’s fine art website
Artist’s online blog
BOOKS Digital Sculpting With Mudbox: Essential Tools and Techniques for Artists.
NEW BOOK 3D Technology in Fine Art and Craft: Exploration of 3D Printing, Scanning, Sculpting and Milling. May 2015
ART AND TECHNOLOGY
Art and Technology Podcast http://digitalsculpting.net/
[title size="2" content_align="left" style_type="default"]Leave A Comment[/title]